Defining Roles
Ektron CMS400.NET contains an Administrators User Group. Any user who is a member of that group automatically has full administrator privileges. See Also: Guidelines for Using the Folder-User Admin Role
The Roles feature lets you assign limited or specific administrator privileges to users who should not have full administrator privileges. For example, you can let certain users create, redirect, or remove tasks but deny them other privileges normally granted to administrators.
|
Best Practice When creating new user groups to use with roles, assign names as a mnemonic aid for the role, especially for folder-specific rules. For example, the Marketing Folder Admins user group could be used for all role members who can administer the marketing folder. |
Note: The Permissions Table lets you control which users can manage a folder’s properties, its content, library items, and create or edit collections. (See Also: Folder Permissions) So, together, the Roles feature and the Permission Table give you the ability to assign administrative privileges to users who are not members of the Administrators group.
This section also contains the following topics.
Guidelines for Using the Folder-User Admin Role
Guidelines for Using a Custom Role
List of Administrator Privileges
Using the Roles Screens
Use the Roles screens to assign limited administrator privileges. To access the Roles screens, go to the Ektron CMS400.NET Workarea and select Settings > Roles.
Note: In the screens listed below, you can select users or groups. However, you can never select the Administrators group, because that group already has all permissions.
The following table describes the Roles screens.
|
Screen |
Lets you give a user or user group the ability to |
For more information, see |
|
System-Wide Roles |
||
|
Alias-Admin |
This user has all the permissions that a member of the administrators group has, such as the ability to Turn aliasing on and off View all manual aliases Activate or deactivate manual aliases Change the primary alias Create automatic, community, and RegEx Regex aliases |
|
|
View and assign a manual alias to content View secondary aliases |
||
| Analytics Viewer |
View Web Traffic Analytics reports Analytics button on the View Content Screen Analytics from the Web site's Access point menu Analytics from a PageBuilder page |
Viewing Web Traffic Analytics Data
|
|
Create or edit Business Rules and Rulesets |
||
|
Create, edit and delete calendars. Note: This role only appears if the classic calendar (prior to version 8.0) is enabled in web.config. For the Web Calendar feature (version 8.0 and higher), use Folder-Admin role to determine which users can create, edit and delete calendars. |
||
|
Create, edit and delete Collections and Menus via the Content tab Note: To manage permissions for creating collections and menus via the folder’s New > Collection or New> Menu option, use folder permissions. See Also: Folder Permissions |
||
|
Collection Approver |
If approval is required for a collection, approve changes to it, including the deletion of a collection. |
|
|
Commerce Admin |
Access the eCommerce screens in the Ektron CMS400.NET Workarea. |
|
|
Community |
Lets role members perform the following community activities: Set system default preferences View and create new - Activity Types - Agents - Messages Enable or Disable Notifications |
|
|
Create, edit and delete and manage all community groups. |
||
|
Create and manage community groups. A user with this role can only manage community groups he has created. |
||
| MasterLayout-Create | Create and edit PageBuilder Master Layouts. | PageBuilder Master Layout |
|
Message Board Admin |
A user with this role can approve pending comments or delete existing comments on a message board. Message board comments for users and community groups are administered on the Web site. Message Board comments for content can be administered on the Web site or from the Content Report screen in the Workarea. |
|
|
View, create and edit metadata definitions |
||
| Personalization Admin |
Perform tasks on Personalization roles screens Edit the Widget Space, Synchronize Widgets and Target Content Configuration screens |
Permissions that Affect Personalization |
| Search-Admin | Create and edit Synonym Sets and Suggested Results | Suggested Results |
|
Smart Forms Admin |
Create or edit Smart Forms |
|
|
Synchronization Admin |
Access the Workarea > Settings > Configuration > Synchronization screen, which lets the user perform all synchronization activities, such as manage sync configurations and profiles run a sync perform content and folder-level sync |
|
|
Create tasks |
||
|
Delete tasks |
||
|
Redirect tasks |
||
|
Taxonomy Administrator |
Create and manage taxonomies |
|
|
Template Configuration |
View, create, update, and delete system templates |
|
| Translation State Admin | Change the translation state of content | Using the Language Export Feature |
|
Create, view, edit, and delete users and user groups |
||
|
Use the Language Xport feature, which copies content into XLIFF files that can be submitted to a translation agency. |
||
|
Folder Specific Roles |
||
|
View and edit folder properties. These users can update properties, permissions, the approval chain, metadata, Web alerts, purge history, etc. For example, create a user group and give it permission to manage the top-level marketing folder. Members of the group can do everything to that folder and its subfolders, but lack authority over other folders. |
||
|
Move or copy content. An Ektron best practice is to create a User Group for this purpose, then assign the group to this role. Ektron recommends against assigning the role to individual users. After assigning the User Group here, go to the folders whose content these users will be allowed to move or copy, and assign to that User Group at least Read Only and Traverse permissions. See Also: Folder Permissions |
||
|
Used by a developer to extend Ektron CMS400.NET’s standard features |
||
Guidelines for Using the Folder-User Admin Role
When setting up users and groups for administrative access over folders, keep these in mind.
After being identified on the Manage Members for Role: Folder User Admin screen, users or groups must also be given at least Read-Only permission for individual folders on the Folder Properties > View Permissions for Folder screen. See Also: Folder Permissions
You must use the same identity on the Manage Members for Role: Folder User Admin and Folder properties screens. So, if a user group is listed for the role, use the same group when assigning folder permissions, not simply a group member. Conversely, if individual users are listed on the role screen, they must be specified in the folder permission.
Ektron strongly recommends adding only user groups to the Folder User Admin role, not individual users.
If you set up an individual user as a role member, he could accidentally receive administrative rights to other folders.
Guidelines for Using a Custom Role
Note: The developer sample page installed with the sample site (http://site root/cms400developer/developer/default.aspx) demonstrates how to use custom roles. From the home page, click Roles > Custom Roles.
.
The custom permissions role lets your Web developer create a site page, and then restrict access to that page’s content (or areas with a page) to users assigned to a custom role.
Items you could show and hide could be as simple as a content block. But they could be more complicated, such as displaying buttons and fields for one user group, and something completely different for another.
Custom roles have no effect inside the workarea.
Examples of Custom Roles
Most of your site visitors belong to different political parties, while some are not registered with any party. By checking the user’s ID against custom roles, you could present registered voters with selections for their party’s primary, and prevent unregistered voters from participating.
Your CMS site visitors fall into two categories: suppliers and buyers. You could check the current user against a custom role and show buyers one set of data and suppliers a different set.
On your eCommerce site, registered students see a list of coupons that are not displayed for anyone else. Or, only registered adults can order age-controlled items, such as tobacco or alcohol.
Control your pages’ background colors, images, and skins based on custom roles. For example, mothers get family-oriented background images while teenagers get rock images and related styling.
Steps for Setting up a Custom Role
To set up a custom role, follow these steps.
1. Set up user groups and add to them users who will have some level of access to the custom page. See Also: Creating a New User Group
To continue the above example, create one group of auditors (who will have read-only access), and another group of administrators (who will have edit access).
2. Create an Ektron CMS400.NET folder to hold the content that will appear on the custom page. Use the folder’s permission table to assign users and groups appropriate access to the folder’s content. See Also: Folder Permissions
3. Set up a Custom role. To do this, go to Workarea > Settings > Roles > Custom Permissions.
4. Create a new role.
5. From the Manage Custom Roles screen, click the role you created.
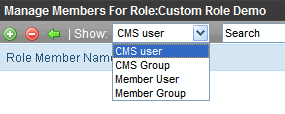
6. From the user type selector, click the type of users you want to add to the role.

7. Click Add (
8. Check the box next to the users or groups that you want to add to the role.
9. Your Web developer creates the custom page. See Also: Information about Custom Roles for your Developer
10. You create content to appear on the custom page. Place the content in the folder you created in Step 2.
Information about Custom Roles for your Developer
The API provides two methods that determine if the current user is logged in, and if he is a member of the Administrators group. The methods let you test customizable roles with conditions outside the standard Is-Logged-In / Is-Admin tests.
API methods are listed below.
|
Method |
Returns |
|
GetRolePermissionSystem(RoleName As String, nUserId As Long) |
a Boolean value indicating if the user belongs to the system-wide custom role |
|
GetRolePermissionFolder(RoleName As String, nFolderId As Long, nUserId As Long) |
a Boolean value indicating if the user belongs to the custom role for the given folder. The procedure for assigning a user to a custom role is Guidelines for Using a Custom Role |
Usage is demonstrated in the Developer sample file site root\CMS400Developer\Developer\Roles\CustomRoles.aspx.vb.
List of Administrator Privileges
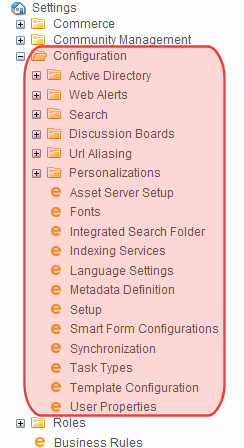
Administrator privileges include access to most screens that appear when you select Settings > Configuration.

Administrators can also
edit folder properties (including Web alerts, metadata, permissions, and the approval chain)
manage aliasing features, such as turn aliasing on or off, activate and deactivate manual aliases, and create automatic aliases
manually alias content
add, edit, or delete a calendar
add, edit, or delete a business rule
create, view, edit, and delete metadata definitions
create, view, edit, and delete taxonomies
create, redirect, and delete tasks
require a collection to go through an approval process
export content for translation to another language using XLIFF
run an eSync
access the eCommerce Module(continued in Screen Descriptions for Online Help)


